z racji tego Ňľe niekt√≥rzy lubińÖ wiedzieńá jak coŇõ dziaŇāa wrzucam artykuŇā Erica Zapletala, "TO TOE-IN, OR TO TOE-OUT? THAT IS THE QUESTION!". MyŇõlńô Ňľe to caŇākiem ciekawa chońá nieprosta lektura.
Written by Erik Zapletal, (C) March 2001.
This article may be freely disseminated, as long as it is not altered from
its present form.
If sections are "cut and paste'd" then the original authorship should be
acknowledged.
~~~~oOo~~~~
TO TOE-IN, OR TO TOE-OUT?
======================
THAT IS THE QUESTION!
===================
INTRODUCTION - The defining characteristic of a "wheel" is that it is a
structure which will roll freely in a direction perpendicular to its
"axle", but it will resist movements in the direction of its axle.
It follows that if we want a racecar to go fast in a straight line, then
all four wheels should point in the same direction - straight-ahead. But if
we want the racecar to go fast around corners - that is, we want the car to
accelerate sideways by using the wheels' resistance to axial motions - then
in just which directions should the wheels point?
Specifically, during cornering, should the front-wheels toe-in, remain
parallel, or toe-out? How will these toe changes effect the dynamics of the
car? And when we have decided which way the wheels should point, how should
we design the steering geometry so that it actually points the wheels in
the right directions? This article attempts to answer these questions.
It should be noted that this article considers mainly the steering of the
front-wheels of a rear-wheel-drive car being driven on a sealed road.
However, many of the principles also apply to rear-steer, or
front-wheel-drive, or dirt, clay or ice road surfaces.
The analysis is based on a simplified two-dimensional plan view of the car.
No suspension geometry is considered. "Zero-point", or "centrepoint",
steering is used - that is, a vertical steering axis passing through the
centre of the tyreprint (giving zero offset, trail, castor-angle and
kingpin-angle). Camber-angle is also zero. It is only changes to the
"steer-angles" that are being considered. The analysis uses specific
dimensions - the car has a wheelbase of 2.6m, and a front track of 1.6m.
Different dimensions will yield different results. The method used for this
analysis is outlined in the section "The $2 Super Computer".
TYRES - Since a car's performance is so dependent on the interaction
between the tyres and the road, we should briefly consider this area.
Figure 1:
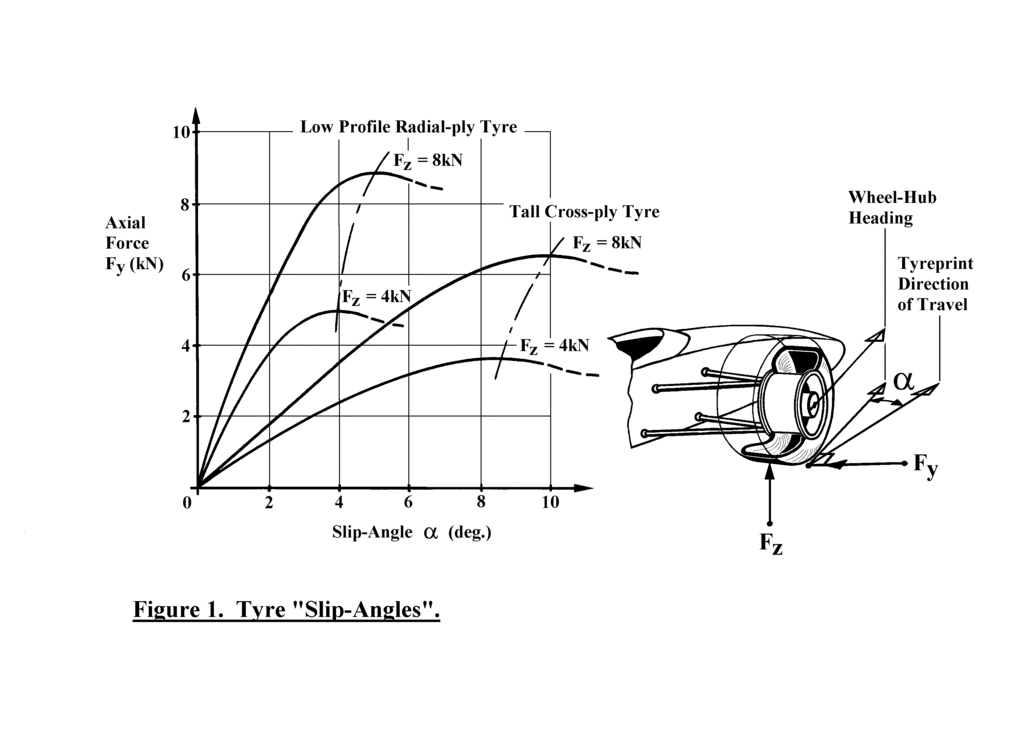
Figure 1 shows two sets of curves. One set is for a wide, low profile,
radial-ply tyre. The other set is for a narrow, tall, cross-ply tyre. Each
set indicates performance at two different vertical loads on the tyre. The
horizontal axis indicates the so called "slip-angle" that exists between
the horizontal heading of the wheel-hub, and the actual horizontal
direction in which the wheel is travelling. The vertical axis indicates the
force Fy that acts between the tyre and the road. This force acts at ground
level, and is, by definition, horizontal and parallel to the wheel's axle
in plan view. This force is often referred to as the "tyre lateral force",
but to avoid confusion with the lateral forces that act on the chassis, we
shall refer to it as the "axial-force".
The graphic to the side of the curves depicts (with exaggeration) the
situation at the lower part of the curves. Here the tyreprint isn't
actually slipping on the road. Rather, the cornering force causes the
flexible sidewalls to distort elastically, with the greatest distortion
being towards the rear of the tyreprint. This distortion allows the
circular "hoop" of the tread to adopt a different camber-angle and
steer-angle to that of the wheel-hub. The change in steer-angle of the tyre
tread allows the wheel-hub to "crab" sideways even though there is minimal
slippage between the tyreprint and the road.
As the axial-force increases, the rearmost parts of the tyreprint start to
slip. This increases the angle between the wheel-hub heading and its actual
direction of travel, and the curves bend to the right. As more of the rear
section of the tyreprint slides, the "vector" of the distributed tyreprint
forces moves forward, causing the self-aligning torque of the tyre to
diminish and the steering to feel lighter.
The curves reach their peak-axial-force when most of the rear section of
the tyreprint is sliding. Beyond this point the axial-force drops off
slightly, and then levels out as all of the tyreprint slides. There is now
almost no directional control from the steering - small changes to the
steer-angle of the wheels will not significantly change the axial-force.
As the vertical load, Fz, on the tyre increases, the peak-axial-force
increases by a lesser ratio. For example, if the vertical load is doubled,
then the peak-axial-force is less than doubled. There is a reduction in the
apparent "Coefficient of Friction" (Cf = PeakFy/Fz) of the tyre as the
vertical load increases. Another effect, which we will come back to later,
is that as the vertical load increases, the peak-axial-force is developed
at a greater slip-angle.
During accelerating or braking there is a "longitudinal" force (horizontal
and perpendicular to the wheel axle) developed between the tyre and the
road. The curves for these longitudinal forces are similar to Figure 1,
with the exception that "slip-angle" is replaced by "slip-ratio" (which can
be defined in several different ways).
The creation of the longitudinal forces involves an expenditure of energy.
During acceleration the forces are creating kinetic energy, and thus
require fuel to be burnt. During braking, the previously created kinetic
energy, and its fuel cost, are dumped as heat. On the other hand, the tyre
axial-forces are almost free. There is a small slip-angle-drag cost,
proportional to slip-angle size, which we will come back to later. But
because the axial-forces are almost orthogonal to the direction of motion,
they can accelerate the car towards the centre of the corner at almost no
energy cost. Cornering power not only wins races, but, thermodynamically
speaking, it is almost free.
The abovementioned reduction of Cf of a tyre with load, often called the
"tyre-load-sensitivity", can be used to adjust the understeer/oversteer
handling balance of a car. For example, if two of the radial-ply tyres in
Figure 1 are fitted to one axle of a car, and each carries a vertical load
of 4kN, then they can together develop a total axial-force of about 10kN.
If during rapid cornering only the outer-wheel is carrying the combined
vertical load of 8kN, then it can only develop an axial-force of about
8.8kN - a difference of 1.2kN. These "lateral-load-transfer" effects can be
achieved by changes to the roll-centre height and spring-rates of the axle,
compared with the roll-centre height and spring-rates of the other axle.
Often the roll-centre and spring-rate changes are considered to be the most
important influences on handling balance. However, it should be noted that
a change in steer-angle of only 1 degree, on just one of the above wheels
carrying a vertical load of 4kN, can produce a change in axial-force of
2kN. A 1 degree change in steer-angle of the same wheel carrying a vertical
load of 8kN, can produce a change in axial-force of 3kN. Before making
adjustments to roll-centre heights or spring-rates, the racecar engineer
should make sure that the wheels are pointing in the right direction.
STATIC-TOE - "Static-toe" refers to the steer-angles of the front wheels,
relative to the car's centreline, when the steering-wheel is in the
straight-ahead position. Static-toe angles are relatively small, typically
less than 1 degree.
Figure 2:
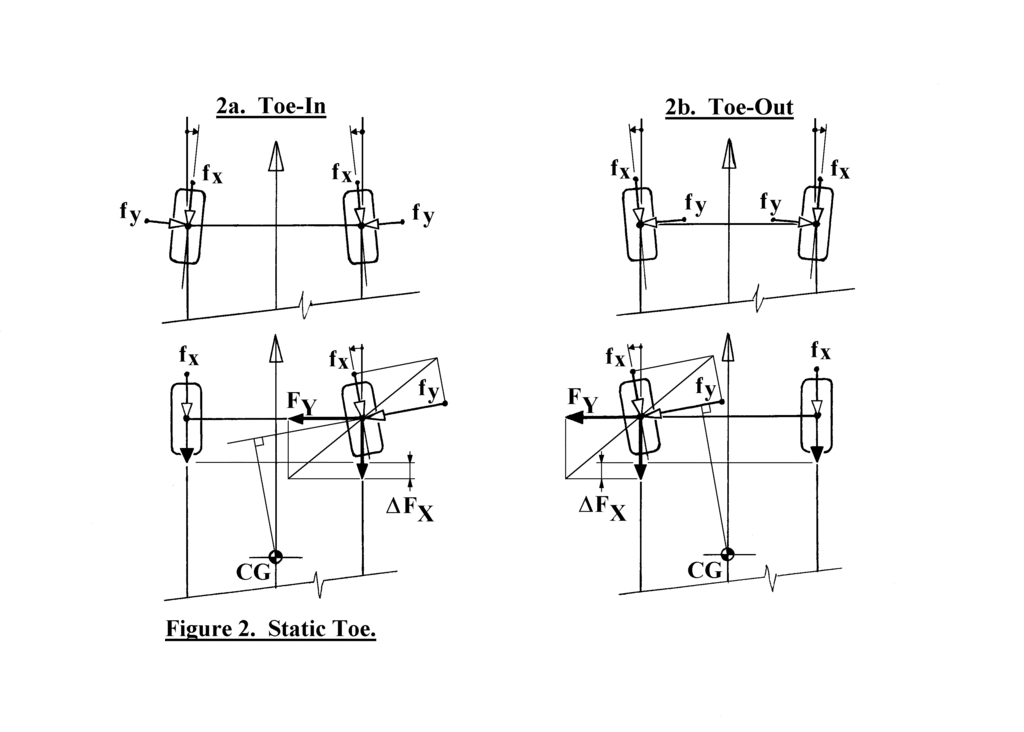
Figure 2a depicts a car with static-toe-in, and Figure 2b depicts a car
with static-toe-out. The upper parts of Figure 2 depict the cars when
travelling along a straight road. The slip-angles (equal to the
static-toe-angles) and the forces acting on the wheels are shown. It can be
seen that while everything is symmetric, the forces will be balanced.
The lower parts of Figure 2 show what happens when a small steering
movement is made to the left, while the car is still travelling
straight-ahead. Alternately, the whole car can be considered to have been
yawed slightly to the left. Now one wheel has zero steer-angle, and zero
slip-angle, and thus only a rearwards rolling-drag force (or some rearwards
braking-force). The other wheel has an increased steer-angle and
slip-angle, hence it has an increased axial-force, plus the same
rolling-drag or braking-force as the first wheel. In each case the
"wheel-coordinate" forces are shown as hollow arrows, while the same forces
in lateral and longitudinal "car-coordinates" are shown as solid arrows.
In both of the lower parts of Figure 2 there is the same total of lateral
force and longitudinal force acting on the front of the car. However, in
Figure 2a - Toe-In - there is a greater longitudinal force at the
right-wheel, then at the left-wheel. The difference in these two
longitudinal forces acts to yaw the car to the right. Conversely, in Figure
2b - Toe-Out - the greater longitudinal force is at the left-wheel, and the
"differential-longitudinal-force" - DeltaFx - acts to yaw the car to the
left.
If the steering is turned further to the left, while the car is still
travelling straight-ahead, then both wheels will have a leftwards
steer-angle, and an associated leftwards axial-force. For equal left and
right wheel loads, the wheel with the greater steer-angle (which is its
effective slip-angle) will generate the greater axial-force. But even if we
assume that the left and right axial-forces are equal, then the Toe-In car
will still have the greater longitudinal force at its right side, and the
Toe-Out car will have the greater longitudinal force at its left side.
This difference in the left and right longitudinal forces arises from the
difference of the steer-angles of the two wheels. For a small angle A (less
than about 10 degrees), sinA ~ A, and cosA ~ 1 (A measured in radians). For
small steer-angles the size of the longitudinal component of the
axial-force, fy, will be approximately equal to the steer-angle x fy. That
is, the longitudinal component of force is directly proportional to the
steer-angle. The longitudinal component of the drag or braking-force, fx,
will be approximately equal to fx - that is, it remains unchanged. It
follows that the wheel with the larger steer-angle will have the larger
total longitudinal force.
Variations in wheel loading will change the size of the axial-force for a
given slip-angle, which in turn will change the sizes of the lateral and
longitudinal components of the forces. But in general, putting more toe-in
on the car will generate differential-longitudinal-forces that act to yaw
the car away from the turn, while putting more toe-out on the car will
generate differential-longitudinal-forces that act to yaw the car into the
turn.
Another way to look at this, is that with toe-in the wheel with the greater
steer-angle has a short moment-arm for its axial-force about the car's
centre-of-mass. With toe-out the wheel with the greater steer-angle has a
longer moment-arm for its axial-force.
As a generalization, the differential-longitudinal-forces are stabilizing
with toe-in (giving stable high speed cruising, and "sluggish" turn-in),
and destabilizing with toe-out (giving "nervous" straightline driving, and
"sharp" turn-in).
DYNAMIC-TOE - "Dynamic-toe" refers to the change in steer-angle of one
front-wheel, relative to the other front-wheel, as the steering is turned
away from straight-ahead. Dynamic-toe is a function of the steering
geometry. At full-lock, dynamic-toe can result in a difference of the two
front-wheel steer-angles of 10 degrees or more.
If the steer-angles of the front-wheels remain equal to each other as they
move from straight-ahead to full-lock, then the steering geometry is said
to have "parallel-steer". If the front-wheels toe-in relative to each other
as they move towards full-lock, then the steering is said to have
"dynamic-toe-in". If the front-wheels toe-out relative to each other as
they move towards full-lock, then the steering is said to have
"dynamic-toe-out".
Dynamic-toe-in is often referred to as "negative-, or anti-Ackermann",
while dynamic-toe-out is sometimes called "positive-, or pro-Ackermann".
The term "Ackermann" doesn't seem to have a universally accepted
definition.
Figure 3:
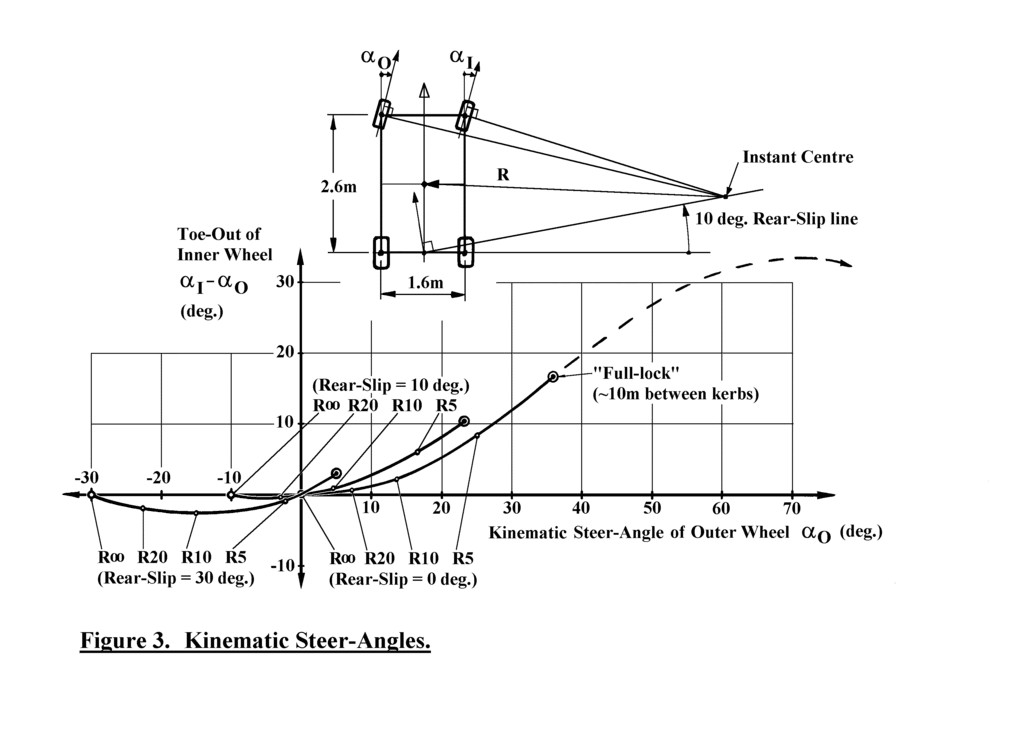
Figure 3 indicates the "Kinematic Steer-Angles" (KSA) of the front-wheels
of a car, as the car rotates around various "Instant Centres". Note that
these angles don't refer to the actual steer-angles of the front-wheels.
Rather, they indicate the direction that the centres of the wheelprints are
travelling, relative to the centreline of the car, for any specific motion
of the car. They can be interpreted as the steer-angles that are required
of the front-wheels, so that the axles of the wheels will be pointing
directly at the instantaneous centre of the car's motion.
The horizontal axis indicates Alpha(Outer), which is the angle between the
centreline of the car, and the direction of travel of the outer-wheelprint.
The vertical axis indicates Alpha(Inner)-Alpha(Outer), which is the
dynamic-toe-out of the inner-wheelprint's direction of travel, relative to
the outer-wheelprint's direction of travel.
Three curves are shown. The rightmost curve indicates the KSA of the
front-wheels when the centre of the rear-axle has zero slip-angle - that
is, when the Instant Centre lies on an extension of the rear-axle-line.
This is typical of low speed travel when the horizontal forces on the rear
tyres are low, and thus their slip-angles are minimal.
The other two curves indicate the KSA of the front-wheels when the centre
of the rear-axle has a slip-angle of 10 degrees and 30 degrees. This
rear-slip-angle is depicted in the graphic. It refers to the direction of
travel of the centre of the rear-axle, relative to the centreline of the
car.
If both rear-wheels are aligned with the centreline of the car, and if
there is a significant amount of rear-slip, then the outer-rear-wheel will
have a slightly smaller slip-angle, and the inner-rear-wheel will have a
slightly larger slip-angle, than that of the centre of the rear-axle. This
would suggest that if the rear-wheels are to run at equal slip-angles, then
they should be set-up with some static-toe-in. On the other hand, if the
car has some form of rear-steer, such as that available on some production
cars, then it is possible for the car to run with large, but still equal,
rear-wheel-slip-angles, while the rear-slip is kept to a small value (say 0
degrees).
Also indicated on each curve are the radii of cornering (prefixed with "R"
and taken to the centre of the car) for different KSAs. The leftmost point
of each curve indicates when the car is travelling in a straight line -
infinite radius. The curves end at a rightmost point which can be
considered to be "full-lock".
(Steer-angles beyond this point are only applicable to high-manoeuvrability
vehicles. They are partially presented here to show that the curves will
eventually return to zero dynamic-toe-out, when the outer-wheel has rotated
a full 180 degrees. The curves are asymmetric in this format because the
outer-wheel becomes the inner-wheel part-way through its travel.)
If a car has a small rear-slip-angle - due to either slow speeds, stiff
rear tyres, or rear-wheel-steer - and the car is turning a reasonably tight
corner, then quite large values of dynamic-toe-out are required if both
front-wheels are to operate at similar slip-angles. For a 5m radius corner,
about 8 degrees of dynamic-toe-out is required. For a full-lock turn more
than 16 degrees of dynamic-toe-out may be required
As the rear-slip-angle increases, then the car needs progressively less
front-wheel steer-angle to negotiate corners. If the rear-slip-angle is
large enough, and if the corner radius is also large enough, then the
front-wheel Kinematic Steer-Angles are negative - that is, opposite-lock.
The dynamic-toe-out required in this situation is also negative - that is,
dynamic-toe-in. This condition of opposite-lock and dynamic-toe-in occurs
when the Instant Centre of the car's motion is in front of the
front-axle-line.
THE "ANTI-ACKERMANN" ARGUMENT - There is a school of thought that argues
that while production cars can benefit from dynamic-toe-out during
cornering (positive-Ackermann), racecars will generally corner faster with
some dynamic-toe-in (negative-, or anti-Ackermann). This argument is based
on the observation of Figure 1, that the greater the load on a tyre, then
the greater the slip-angle that it must run at, in order to develop its
maximum cornering force. Since the outer-wheel of a cornering car will
carry a greater load than the inner-wheel, it follows that the outer-wheel
must run at a greater slip-angle than the inner-wheel, if both wheels are
to develop their maximum cornering forces.
Figure 4:
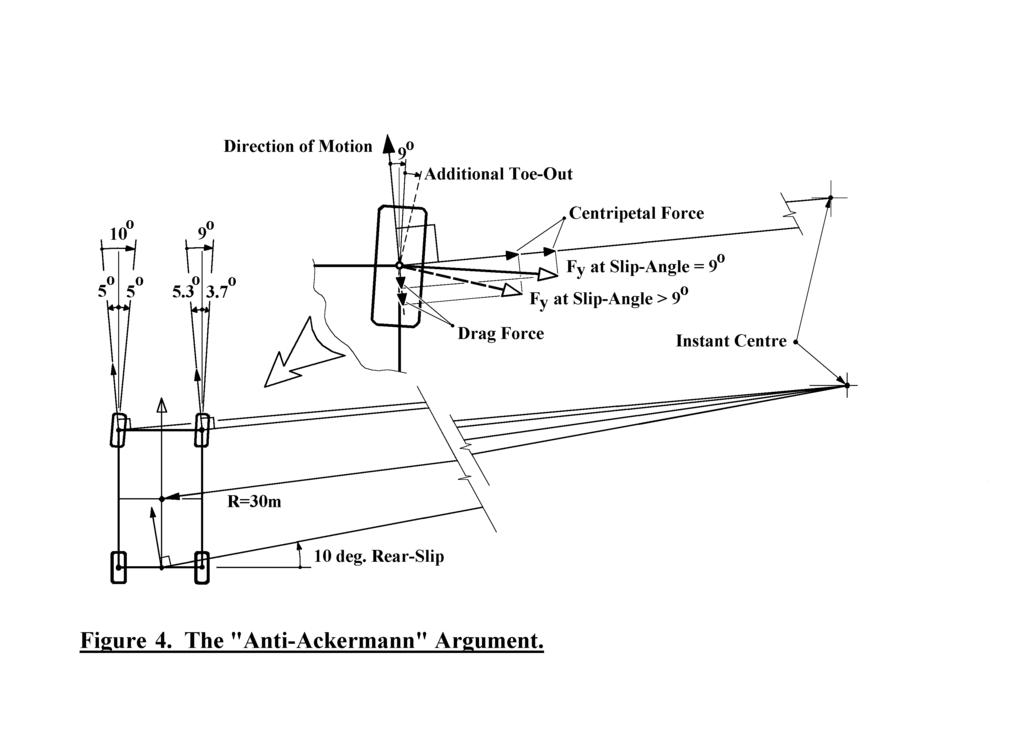
For example, consider Figure 4, together with the cross-ply tyre curves at
the right of Figure 1, and the "Rear-Slip = 10 deg." curve of Figure 3.
With 10 degrees of rear-slip, and a corner radius of about 30m;
KSA of Outer-Wheel = -5 degrees,
Toe-Out of Inner-Wheel = -0.3 degrees, so
KSA of Inner-Wheel = -5 + (-0.3) = -5.3 degrees
If the heavily loaded outer-wheel develops its peak-axial-force at a
slip-angle of 10 degrees, and the more lightly loaded inner-wheel develops
its peak-axial-force at 9 degrees, then for maximum cornering force;
Outer-Wheel Steer-Angle = -5(KSA) + 10(slip-angle) = +5 degrees, and
Inner-Wheel Steer-Angle = -5.3(KSA) + 9(slip-angle) = +3.7 degrees
as indicated at the left of Figure 4.
That is, there should be about 1.3 degrees of actual dynamic-toe-in, or
anti-Ackermann, when the front-wheels are steered about 5 degrees away from
straight-ahead.
The upper-right section of Figure 4 gives a more detailed view of the
situation at the inner-front-wheel. The axial-force Fy doesn't point
directly at the Instant Centre, but, by the definition of its 9 degree
slip-angle, it points 9 degrees behind this radial line. The slip-angle
thus generates a "drag" component of the axial-force that is rearwards to
the direction of wheelprint travel. This "slip-angle-drag" is an
undesirable force as it requires forward thrust, and thus engine power and
fuel, to overcome it. One of the main benefits of radial-ply tyres is that
they corner at lower slip-angles, and thus with less drag, than do
cross-ply tyres.
If the car in Figure 4 had a steering linkage that generated
dynamic-toe-out, then the inner-wheel steer-angle would be greater than 3.7
degrees, and the inner-wheel slip-angle would be greater than 9 degrees.
The tyre would thus be running at a point past its peak-axial-force. Its
"centripetal" component of force would be reduced, and its drag component
of force would be increased. The car's total cornering force would thus be
reduced, and it would require more engine power for the car to maintain the
same speed. This is the essence of the anti-Ackermann argument.
There are several details that should be kept in mind when considering this
argument. They are:
1. Large slip-angles.
The above philosophy was developed quite a few years ago, when racecars had
the high slip-angle tyres used in the above example. The race-tracks of
that period also had fewer tight-radius corners such as "chicanes". Much of
the racing involved long straights followed by high-speed large-radius
"power-limited" bends. In this situation, and for dirt-track cars with
very high rear-slip-angles, some anti-Ackermann, or dynamic-toe-in from the
steering may be helpful. The maximum amount of dynamic-toe-in needed is
about 3 degrees for dirt racers, and less than 2 degrees for road racers.
As explained previously, large slip-angles are not desirable because they
generate drag. While sideways might look fast, it is not necessarily the
quickest way through a corner. Likewise, it is not desirable to have widely
different loads on the wheels, as this reduces the maximum available
horizontal wheel forces via the tyre-load-sensitivity effect.
It follows that it is desirable to fit a car with tyres that develop their
peak-force at small slip-angles - for example, low-profile radial-ply tyres
- and to minimise the load variations of the wheels. With low slip-angle,
evenly loaded wheels, the need for dynamic-toe-in is considerably reduced.
2. Which tyre should peak first?
A racecar might not have the ideal steering geometry that allows its
front-wheels to reach peak-axial-force simultaneously. If the outer-wheel
reaches peak-axial-force before the inner-wheel, due to excessive toe-in,
then any increase in slip-angles will decrease the outer-wheel's
axial-force, and increase the inner-wheel's axial-force. A consideration of
the car-longitudinal components of these forces would suggest that such a
change will exert an oversteering yaw moment on the car, which is
destabilizing. Conversely, if the inner-wheel reaches peak-force first, due
to insufficient toe-in, then any increase in slip-angles will result in a
stabilizing understeer yaw moment acting on the car.
These effects may be small, but they would suggest that a racecar with some
"peak-force-toe-out" (in the sense that the inner-wheel reaches peak-force
first) would be more stable "at the limit", than a car with
"peak-force-toe-in".
3. Transient manoeuvres.
During a fast lane-change, as may be necessary during overtaking, or for
accident avoidance, a driver will typically turn the steering wheel through
a large angle - perhaps half-lock or more. The purpose of the large
steering movement is to make the front-wheels yaw the front of the car to
one side as quickly as possible. It is only when the car has a yaw angle to
its direction of travel that its rear-wheels can develop a lateral force,
and thus push the rear of the car sideways.
A steering geometry that generates large dynamic-toe-out angles will cause
the inner-wheel of the car to develop a larger steer-angle, and slip-angle,
than the outer-wheel, whenever a large steering movement is made, and the
car is still travelling straight-ahead (see the "Static-Toe" section, and
Figure 2). This large rearwards movement of the inner-wheel's axial-force
vector will effectively drag that side of the car backwards, exerting a
large yaw moment on the car, thus improving the car's transient response
times.
4. Sharp corners.
Many racing textbooks advocate steering geometries that are anti-Ackermann,
or, for the fence-sitters, parallel-steer. They do so largely because these
geometries can be useful on high-speed large-radius (small steer-angle)
corners - conditions that apply to many of the top categories of
motorsports.
There are many categories of racecar that are required to turn sharp
corners - trials, autocross, rallycross, hillclimb, Formula SAE/Student,
and so on. If such a racecar has a steering geometry that gives
parallel-steer, then it will have a dynamic-toe curve that is a horizontal
line in Figure 3 (zero toe-change). An anti-Ackermann steering geometry
will produce a dynamic-toe curve that is initially horizontal, but then
drops below the horizontal axis of Figure 3.
A racecar that must turn sharp corners may need well over 10 degrees of
dynamic-toe-out to enable its front-wheels to operate at similar
slip-angles. If this racecar has parallel-steer then its wheels will be
"effectively" toed-in at over 5 degrees per wheel whenever it is turning a
sharp corner. If this racecar has anti-Ackermann steering, then its wheels
will be "effectively" toed-in even more.
We will use the term "effective-toe" to refer to the discrepancy between
the KSAs and the actual steer-angles. Effective-toe-angles, if measured at
each wheel, are equal to the tyre's slip-angles. Since we often don't know
the individual front-wheel slip-angles, we can refer to the
"effective-total-toe-in" between the two front-wheels as being equal to the
KSA Toe-Out (for the car's specific instantaneous motion), minus the actual
total-toe-out of the front-wheels (that is, the included angle between the
two front-wheels).
It might be useful for the reader to conduct a small experiment to clarify
the above situation. Adjust the static-toe of your car to its maximum safe
extent (leave enough thread in the adjustments to hold the track-rods
together). Regardless of whether it is toe-in or toe-out, try to get at
least 5 degrees per wheel - that is, at least 10 degrees of toe difference
between the two wheels. Now drive the car slowly along a quite road.
Several things should become apparent. Firstly, the tyres won't like it,
and they will protest loudly. Both tyres will initially be operating close
to their slip-angle-peaks where there is a lot of real "slip". Secondly,
the steering will be "light". Most of each tyreprint will be sliding so
there will be little self-aligning torque or steering feel. Thirdly,
despite the driver's steering efforts, the nose of the car will behave like
an overeager puppy trying to sniff every tree either side of the road. One
tyre will occasionally get a better grip (due to a change in road surface
or wheel loading) and it will push the other tyre over its slip-angle peak,
thus changing the direction of the car.
This experiment is an inexpensive version of the tyre-testing machines that
produce the curves of Figure 1. It gives a slow-motion view of the tyres as
they are operating close to their slip-angle peaks.
The experiment also shows what parallel-steer, or anti-Ackermann, does to
the front-wheels of a car whenever it turns a sharp corner. The wheels are
forced to run at a large effective-total-toe-in. At least one wheel
(typically the outer-wheel) will be close to, or beyond its slip-angle
peak, and it will be reluctant to respond to any steering inputs from the
driver. The inner-wheel may, in fact, be trying to push the nose of the car
out of the corner.
If the car has stiff front springs, and if it can corner fast enough, then
it may be able to lift the inner-front-wheel off the ground, and stop it
from fighting the outer-wheel. Speed and noise will make this fight less
obvious, but while both front-wheels are on the ground the anti-Ackermann
car won't like sharp corners.
STEERING GEOMETRY - The previous sections discussed the vehicle dynamic
responses that we might expect from different dynamic-toe behaviours. This
section shows how the different dynamic-toe behaviours are generated by
different steering geometries.
Figure 5:
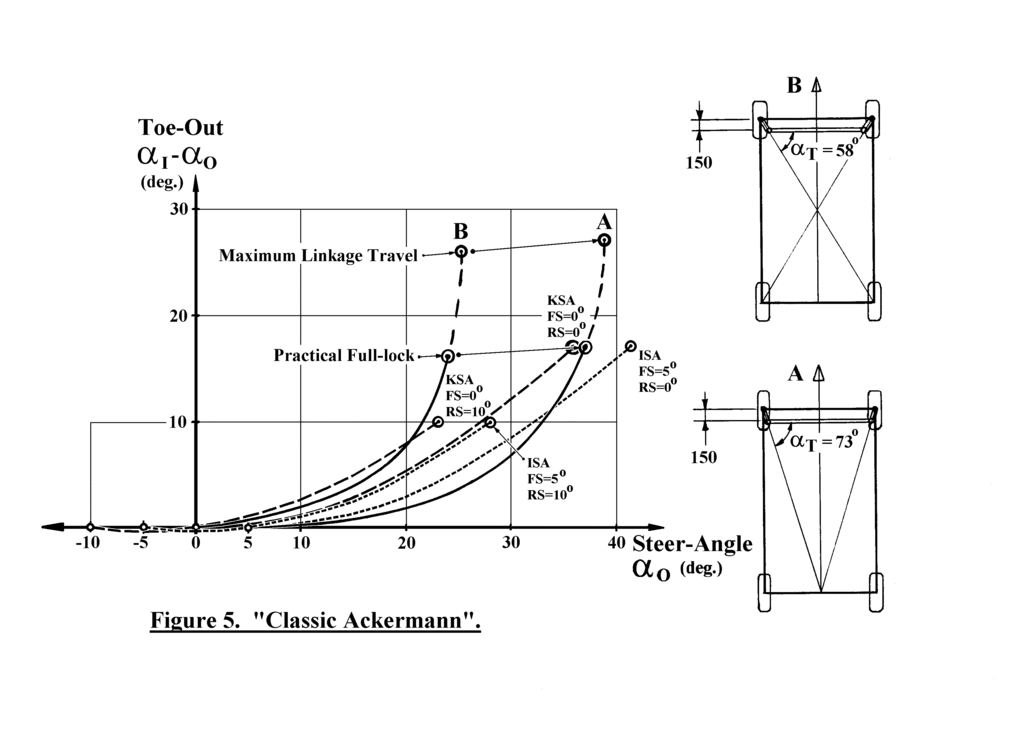
Figure 5 shows the KSA curves of Figure 3 for rear-slip-angles of RS = 0
degrees, and RS = 10 degrees. These curves give the "ideal-steer-angles"
for the front-wheels, if they were to run at a "front-slip-angle" of FS = 0
degrees.
To generate a cornering force, the front-wheels must run at a non-zero
slip-angle. Two additional curves are shown that indicate the
ideal-steer-angles (ISAs) that are required if both front-wheels are to
have a front-slip-angle of FS=5 degrees, and there are rear-slip-angles of
RS = 0 degrees, and RS = 10 degrees. It can be seen that these two ISA
curves are simply the previous two KSA curves translated sideways by the
additional front-wheel slip-angle of 5 degrees.
The four curves give an indication of the dynamic-toe angles that are
required of a steering geometry, so that all four wheels can run at an
appropriate slip-angle. The KSA curve of FS = RS = 0 degrees is repeated in
Figures 6 to 9 to aid in the comparison of the various steering geometries.
This curve is used because it would be the ideal dynamic-toe curve if the
car had "ideal" wheels that cornered with zero slip-angle. This curve is
also an approximate average of the curves that have practical front and
rear-slip-angles, on sealed road surfaces.
Figure 5 also shows two steering systems typical of beam-axle suspensions.
In each case the wheel-hub has a rearward mounted "steer-arm", and the ends
of the two steer-arms are connected by a track-rod. The traditional
"Ackermann geometry" is shown as "A", where the centrelines of the two
steer-arms intersect at the centre of the rear-axle. The second steering
geometry, "B", has the steer-arm centrelines intersecting at the wheelbase
mid-point. The accompanying curves show the relationship between the
outer-wheel steer-angles, and the dynamic-toe-out of the inner-wheel, for
these two geometries.
The curves "A" and "B" end (at their top-right) when the track-rod becomes
"straight" with the inner-wheel steer-arm - that is, the track-rod cannot
rotate the inner-wheel-hub any further. A practical full-lock limit would
stop the inner-wheel at least 10 degrees before the track-rod goes
straight, so that the steering can't jam at full-lock.
The curves show that Ackermann geometry, "A", is only an approximation to
the KSA curve, and in fact it only gives Kinematic Steer-Angles at zero
steer-angle, and at about full-lock (for the given dimensions). For most of
the steering range the wheels will be running with an
effective-total-toe-in of about 3 to 5 degrees. The second geometry, "B",
has the wheels running with an effective-total-toe-out throughout the
steering range.
A disadvantage of geometry "B" is that it has a lower maximum outer-wheel
steer-angle, and thus a larger minimum turning circle than geometry "A". At
full-lock the wheels have a lot of toe-out, implying a lot of wheel-scrub
during low-speed parking manoeuvres. A compromise geometry somewhere
between the two shown, plus some static-toe-in, would give stable toe-in
for high-speed large-radius corners, and some effective-toe-out at
full-lock, to help the car around hairpins.
Figure 6:
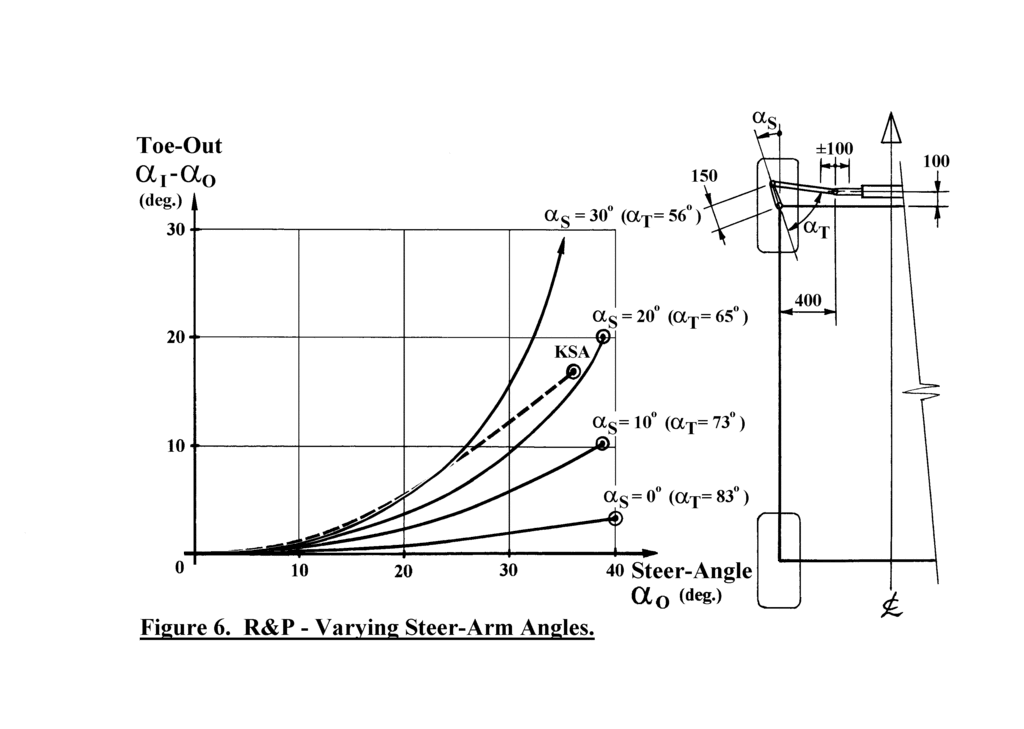
Figure 6 shows a rack-and-pinion (R&P) steering geometry as typically used
on racecars. The R&P and the steer-arms are mounted in front of the
front-axle line. Four curves are shown for different angles of the
centreline of the steer-arm. The curves end when the R&P runs out of
travel, which in this case is +/-100 mm from centre. A shorter steer-arm
would require less R&P travel.
While the steer-arm angle is less than 20 degrees from straight-ahead, the
wheels maintain effective-toe-in throughout the range of steering travel.
Only when the steer-arm-to-track-rod joint is moved past 20 degrees (that
is, more than 52mm outboard of the king-pin, for the 150mm long steer-arm)
do the wheels start to develop effective-toe-out. Even with the "30 degree
Steer-Arm" curve (steer-arm-end-joint about 75mm outboard of the king-pin)
this toe-out only becomes significant close to full-lock.
Figure 7:
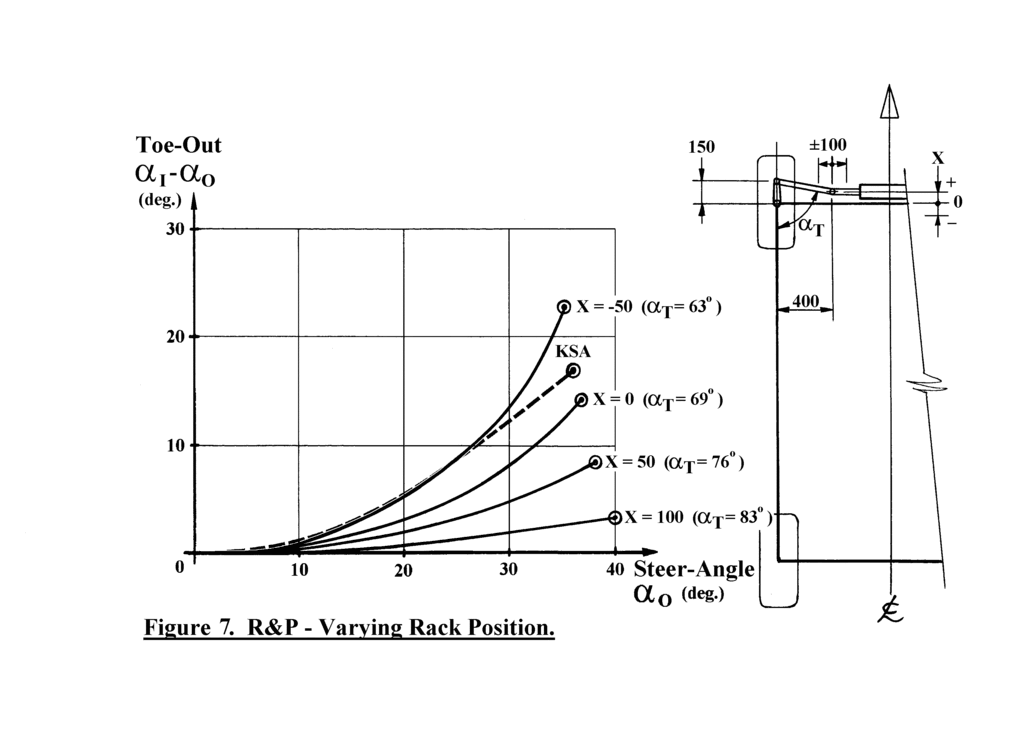
Figure 7 shows a similar R&P system to Figure 6, but this time the
steer-arm angle is kept at straight-ahead, and the longitudinal location of
the R&P, as it is mounted in the chassis, is varied.
The curves of Figure 7 are similar to those of Figure 6. A R&P mounted
100mm in front of the axle with a steer-arm angle of about 25 degrees, has
a similar dynamic-toe curve to a R&P mounted 50mm behind the axle with a
steer-arm angle of 0 degrees. The choice of layout depends on packaging
issues such as R&P placement in the chassis, versus steer-arm placement
within the wheel assembly.
An important observation to be made of Figures 5, 6, and 7 is the size of
the angle Alpha(T) between the steer-arm and the track-rod, and its effect
on the dynamic-toe curve. When Alpha(T) is around 90 degrees there is
minimal dynamic-toe change, and the steering geometry approximates
parallel-steer. As Alpha(T) becomes more acute, the inner-wheel turns more,
and the outer-wheel turns less, for a given linear movement of the
track-rod, and the dynamic-toe-out increases.
If the steering geometry has rearward facing steer-arms (as in Figure 5),
and a rear mounted R&P, the dynamic-toe curves will still behave in a
similiar manner to that described above. That is, changes to steer-arm
angle and R&P placement that make Alpha(T) more acute (as it is shown in
Figure 5) will tend to give more dynamic-toe-out.
Often it is not possible to use large steer-arm angles, as in Figure 6,
because the brake-disc is in the way. Likewise, it may not be possible to
move the R&P behind the front-axle line, as in Figure 7, because of
intrusion into the footwell or engine space.
Figure 8:
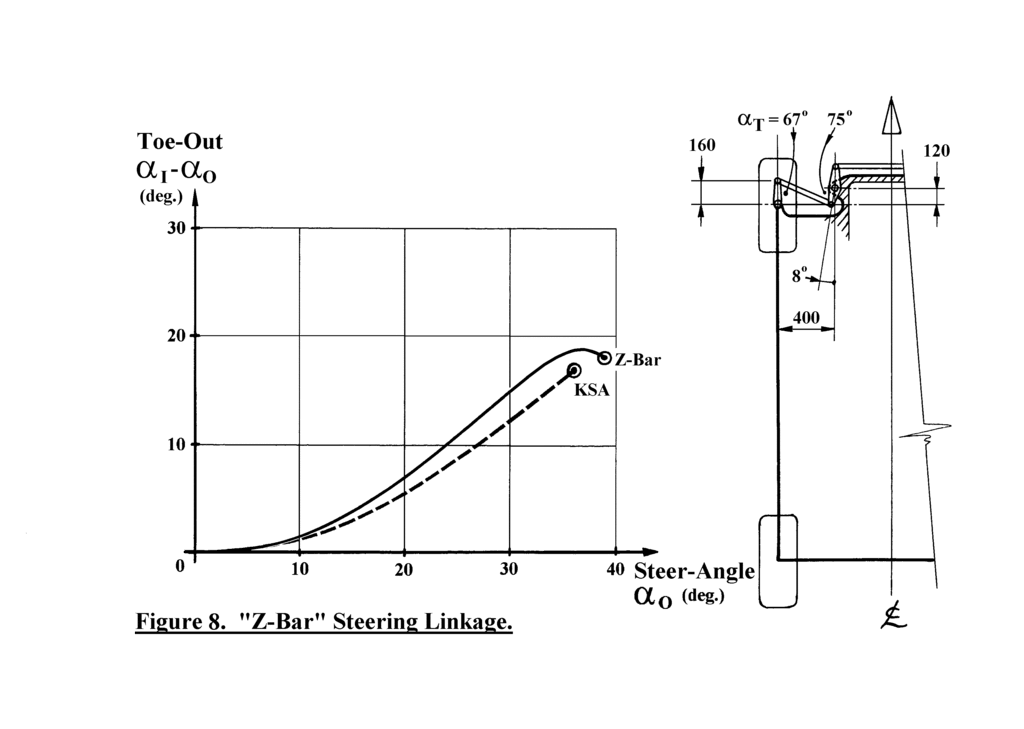
Figure 8 shows a steering geometry that may appear more complicated than
the previous systems, but it has several advantages. With this layout two
"idlers" are mounted either side of the chassis. They are connected via
their front-arms to a central-track-rod, and via their rear-arms to
outer-track-rods which then connect to the steer-arms. Either of the idlers
could be driven by a steering-box, or the central-track-rod could be
replaced by a R&P and two short track-rods. If the suspension wishbones are
long enough, then the two idlers can be merged into a single central idler,
suitably driven.
One advantage of this layout is that it can improve packaging convenience.
The steer-arms can be straight-ahead, and the central-track-rod, or R&P,
can be mounted well forward of the front axle line for increased footwell
space. Another advantage is that the increased number of angles between the
track-rods and the rotating idlers and steer-arms, makes it easier to
tailor the shape of the dynamic-toe curve. For example, it takes only a
little experimentation to get the dynamic-toe curve to track the KSA curve
to within half a degree.
The specific layout shown in Figure 8 has the idlers and central-track-rod
acting as a parallelogram - that is, both idler-front-arms are always at
the same angle. The two acute angles in the "Z-Bar" linkage (idler-rear-arm
to outer-track-rod, and outer-track-rod to steer-arm) cause the dynamic-toe
curve to rise rapidly during initial steering movement - more rapidly than
in any of the previous R&P curves. However, as the
idler-rear-arm-to-track-rod angle straightens (for the inner-wheel) the
dynamic-toe curve is pulled back down. With some initial static-toe-in,
this layout would give stable high-speed cruising and cornering, with
responsive turn-in to tighter corners, and negligible wheel scrub during
low-speed full-lock manoeuvres.
Figure 9:
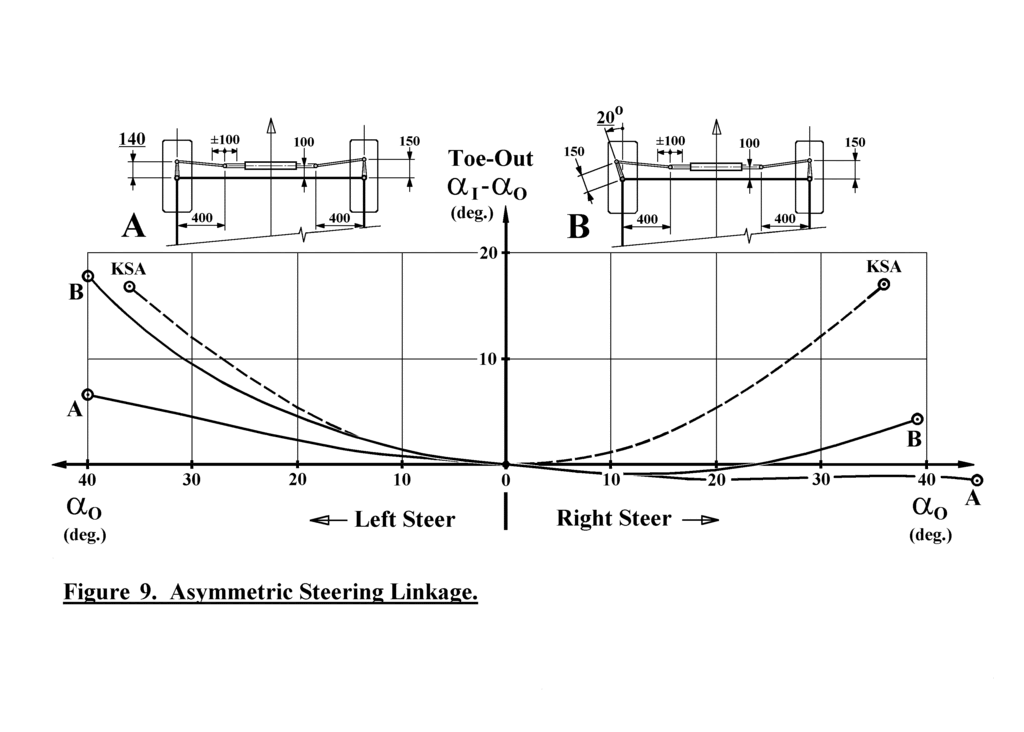
Figure 9 shows two steering linkages that generate asymmetric dynamic-toe
curves. These asymmetric curves are suitable for asymmetric racecars, such
as those that race on ovals and spend most of the time either going
straight, or turning left. The dynamic-toe curves are shown for both Left
Steer - that is, the steering-wheel is turned to the left - and Right Steer.
Geometry "A" is similar to the example in Figures 6 and 7, that has the R&P
100mm in front of the front-axle line, and has zero steer-arm angles. It
differs in that its left-steer-arm is slightly shorter than the
right-steer-arm. This change has the effect of rotating the previously
symmetric curve clockwise. It also pulls the rightmost end of the curve to
the right (more left-steer-arm-angle), and down (less toe-out, or more
toe-in).
Geometry "B" is similar to the example in Figure 6 with a 10 degree
steer-arm-angle (10 degrees on both sides, hence an included angle of 20
degrees between the two steer-arms). It differs in that, with the steering
straight-ahead, the 20 degree angle is at the left-steer-arm, while the
right-steer-arm points straight-ahead. Again, the asymmetry has the effect
of rotating the previously symmetric curve clockwise.
In both of the above examples, and especially in example "B", the steering
has considerable dynamic-toe-out when turning left. This would imply sharp
turn-in when turning into the left-hand corners. When turning right, as may
happen if the driver has to counter-steer through the left turns due to a
large rear-slip-angle, then the steering has some dynamic-toe-in - as
required by the anti-Ackermann argument. With larger rightwards
steer-angles, example "B" regains some dynamic-toe-out.
Many more variations of steering linkages, and their resulting dynamic-toe
curves, are possible. But one thing that we can't expect of these
mechanical steering linkages, is that their dynamic-toe curves will change,
or "adapt", according to the different conditions during a race. That might
require some kind of an "active-steering-linkage", and is beyond the scope
of this article...
FURTHER CONSIDERATIONS - About 50 years ago, the theoretical
"Bicycle-Model" was developed to aid in the understanding of vehicle
dynamics. The simplest version of this model is a 2-D plan-view of a
vehicle, with one front-wheel, one rear-wheel, and a centre-of-mass located
somewhere between. Each wheel is assigned a representative lateral
stiffness - the initial slope of the curves in Figure 1. When the dynamic
effects of driving this model around a particular corner at a particular
speed are calculated, then the model gives reasonably accurate predictions
of the "differential-lateral" forces - the difference between the
front-wheel and the rear-wheel lateral-forces - that are responsible for
understeer or oversteer behaviour.
Extensions of this model include the reduction in cornering power that is
due to lateral-load-transfer, camber change, and so on. Quite complicated
versions of the model have been developed. Over the years there have been
hundreds, if not thousands of papers based on this model, presented to
various learned societies around the world. For many Vehicle Dynamicists,
the bicycle-model is their bedrock.
However, the bicycle-model takes little account of the vehicle's width. The
vehicle is symmetric about its centreline. There can be no
differential-longitudinal-forces.
If the reader has driven a tank, bulldozer, or other skid-steer vehicle,
then they will appreciate how powerful the differential-longitudinal-forces
can be when it comes to turning a vehicle. Likewise, anyone who has used
fiddle-brakes will respect the yawing power that can be generated by a
small rearwards force on one side of the car.
Many production cars are being fitted with Active-Stability-Control systems
(or some such acronym) that use the Anti-lock Brake System (ABS) hardware
to brake one side of the car to control yaw motion, and thus to control
understeer/oversteer. It would be entirely feasible to build a high-speed
large-radius Indy-style racecar that has all four wheels fixed rigidly
straight-ahead, and uses only a joy-stick controlled ABS system for
steering. This car could even negotiate Formula 1 style racetracks,
although its tyre wear would be increased through the tighter corners.
Steering a car by using the brakes, although feasible, isn't particulary
efficient. Overall the car would be slower. Besides which, ABS and similar
systems are banned from most forms of racing. But the yawing power that is
available from such differential-longitudinal-forces isn't specifically
banned.
One of the easiest ways to take advantage of this yawing power is to use
dynamic-toe changes. Dynamic-toe-out of the front-wheels generates just the
right sort of differential-longitudinal-forces that help yaw the car into a
corner. Parallel-steer, and anti-Ackermann steering, generate
differential-longitudinal-forces that act to yaw the car away from the
corner.
No new hardware has to be developed to exploit these yawing forces. All
cars have the basic hardware - it is just a matter of adjusting the
geometry.
~~~oOo~~~
THE $2 SUPER COMPUTER
=====================
There is a children's song "The Super Computer", by Don Spencer, that has
the lyrics:
"There's a super computer that can do anything.
It can count, it can smile, it can talk, it can sing.
It can run, it can jump, it can laugh, it can cry,
With its own compact and portable power supply.
...
It doesn't use buttons, has nerves instead.
There's a super computer inside your head."
Since we all come thus equipped, the only additional "coprocessors" needed
to produce the curves shown in this article are A4 paper (5mm graph, if
available), fine-point biro, straightedge (ruler), compass, and a
protractor. If the reader doesn't have any of these, then they should be
available at the local newsagent for less than $2 total (the author bought
a nice protractor, and an adequate compass, for 50 cents each).
If the reader prefers to use one of the more expensive, although
undoubtedly more fashionable boxes of electronic mischief as their
coprocessor, then the method of solution would be much the same as outlined
here. For example, a computer aided drafting program can be used in a
similar manner to that described below.
(If many different steering geometries are to be investigated, then a
dedicated computer program executing this same method, might be
appropriate. The maths are straightforward. For the generalised 3-D case
the program must find the correct intersection point of the circular arc
traced out by the steer-arm-end-joint, and the surface of the sphere traced
out by the track-rod-end-joint - there can be 0, 1 or 2 intersection
points.)
The first curves to be produced are the Kinematic Steer-Angle curves, as
shown in Figure 3, for the specific wheelbase and track dimensions, and
various rear-slip-angles. The method is as follows:
1. Draw a rectangle proportional to the car's wheelbase and track in the
lower left corner of the page. The example in Figure 3 was drawn at a scale
of 1:50, that is 52mm x 32mm. The top-left-corner of this rectangle
corresponds to the front-left-wheel.
2. Use the protractor to mark out a line from the centre of the rear-axle,
towards the right and up, at the required rear-slip-angle - a horizontal
line for 0 degrees rear-slip.
3. Similarly, mark out lines from the front-left-wheel at angles of 10, 20,
30, and 40 degrees, towards the right and down, until these lines intersect
the rear-slip line. These intersections are the Instant Centres (ICs) of
the turn. These lines correspond to changes of angle of the
front-left-wheel's axle, and also to this wheel's steer-angle from
straight-ahead. If there is a lot of rear-slip, then lines at -10 degrees,
and so on, will be required. If a bigger sheet of paper is available, then
some lines at +/-5 degrees can be added, although at these angles the
wheels are almost parallel.
4. Use the straightedge to draw lines from the front-right-wheel to the
ICs. Use the protractor to measure the angles of these lines.
5. Draw up a table of corresponding front-left and front-right-wheel
angles, and also the difference of the angles - that is, right
(inner-wheel) angle minus left (outer-wheel) angle.
6. Transfer the above values to a graph, with the outer-wheel angles along
the horizontal axis, and "Kinematic Toe-Out" values (inner minus
outer-wheel angles) along the vertical axis. Join the points with straight
lines, or with a "French-curve" or a "spline" if available. Done!
Figure 10:
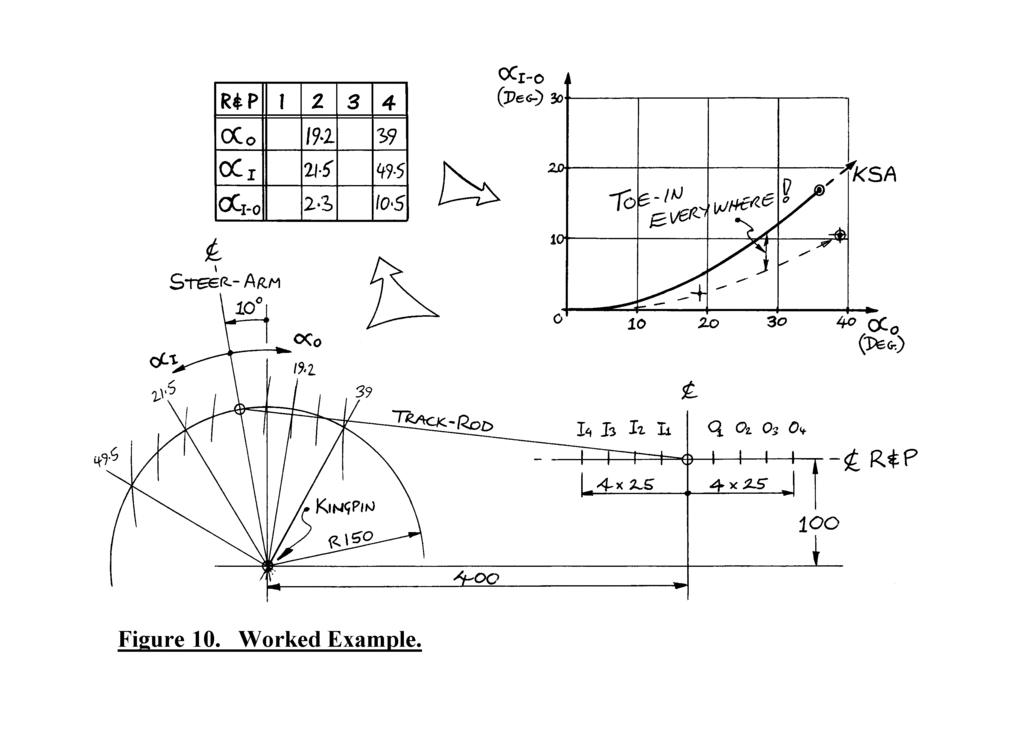
Figure 10 shows how to produce the Dynamic-Toe curves for a specific R&P
steering geometry. The method is as follows:
1. As with Figure 10, draw the basic steering geometry across the bottom of
the page. Only draw one half of the steering system. Use a scale that is as
large as possible - 30% to 50% for A4 paper (see below for comments
regarding the scale). Position the kingpin first. Draw an arc of radius
equal to the steer-arm length. Draw in the centreline of the steer-arm.
Draw the rack centreline and the rack end-joint (with the rack "centred")
in the correct position relative to the kingpin. Draw the track-rod from
the rack-end-joint to the steer-arm-end-joint.
2. Mark off positions along the rack centreline corresponding to the
position of the end-joint at 25%, 50%, 75% and 100% full-lock, to the left
and right of the already drawn "centred" position. Alternatively, mark
positions at regular, say 20mm, positions to the left and the right of the
rack-end-joint. If the steering is via a rotating idler instead of a rack,
then mark of symmetric positions to the left and the right of the centred
idler position.
3. Use the compass to measure the track-rod length. With the compass point
on each of the abovemarked rack positions, draw an arc that intersects the
steer-arm arc. Draw lines from each of these intersections to the kingpin.
Align the "zero" of the protractor to the original steer-arm centreline,
then measure the angles to each of the newly drawn steer-arm-angle lines.
4. Draw up a table of corresponding steer-arm-angles to the left, and to
the right, of the original steer-arm line. If drawn as in Figure 10, the
leftward angles represent the inner-wheel steer-angles, and the rightward
angles represent the outer-wheel steer-angles. Provided that the "rack
marks" are symmetric about the rack "centremark", then each inner-wheel
steer-angle will have a corresponding outer-wheel steer-angle, for that
particular displacement of the rack. Also note on the table the differences
of inner minus outer-wheel steer-angle.
5. On a similar graph to the KSA, draw a curve of outer-wheel steer-angles
versus dynamic-toe change of the inner-wheel. Done!
Using the above method it should be possible to draw the dynamic-toe curve
for a specific steering layout in about 15 minutes - less, if the reader is
not drawing his curves at the kitchen table while his children are doing
their homework. For a quick feeling of the shape of the dynamic-toe curve,
only the half and full-lock angles have to be plotted. If these look good
then more points can be plotted for a more accurate curve.
If an "A0" size drawing board with built-in protractor is available, then
very quick and accurate curves can be expected. In this case, if full-scale
or larger drawings are used, then the accuracy will probably exceed that on
the real car, given the manufacturing tolerances and compliance of the
linkage and suspension under load.
If a finished curve has a "kink" in it, then it is probable that a mistake
was made. This could be due to wrong compass point positioning, flex of a
cheap compass, poorly drawn steer-arm-angle lines, or misreading of the
protractor. If the arc of the track-rod is almost parallel with the arc of
the steer-arm, making the intersection point difficult to determine, then
the real linkage will also be "compliant" at this point in its travel.
The caveats at the beginning of the main article, regarding the simplified
2-D analysis, should be kept in mind when interpreting the curves produced
by this method. But a 90% accurate answer today, may well be better than a
99.9999% accurate answer "sometime tomorrow".
~~~oOo~~~